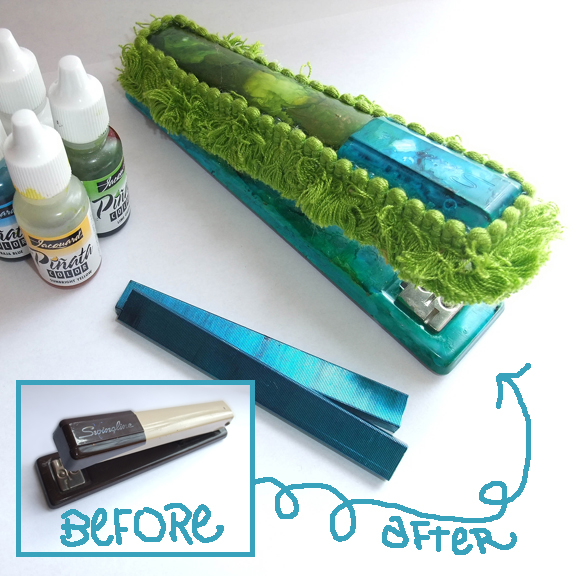
I’ve stared at the same old, ugly stapler on my desk for a long time. I use that standard office tool almost every day. I decided it was time that it got a makeover/sprucing up and joined in on my mantra of “art just for fun.” Now when I staple documents together, I can’t help but smile at my cheerful office companion.
PROJECT MATERIALS: stapler; staples; Jacquard Piñata alcohol-based paint (I chose a palette of white plus three additional colors: sunbright yellow, lime green, baja blue); Jacquard Piñata clean up solution; Jacquard Piñata claro extender; clear satin fixative; 16″ of trim (more or less depending on the size of stapler); aluminum flashing (to use as a paint palette); paint brushes; glue gun and glue sticks.
DIRECTIONS:
1. Clean stapler as needed. When the stapler is clean and dry, apply paint directly from the bottle to the stapler. You may also squeeze a small amount of paint to the aluminum palette and apply the paint to the stapler with a paintbrush. Continue adding paint to the stapler. Piñata paints dry quickly so use claro extender if you want to buy yourself more drying time. Otherwise, enjoy experimenting. You can always remove the paint with the clean-up solution and start over if you wish.
2. After you have painted all the parts of the stapler, let dry, preferably overnight.
3. To give your stapler an extra coat of protection, spray with a clear satin fixative and let dry.

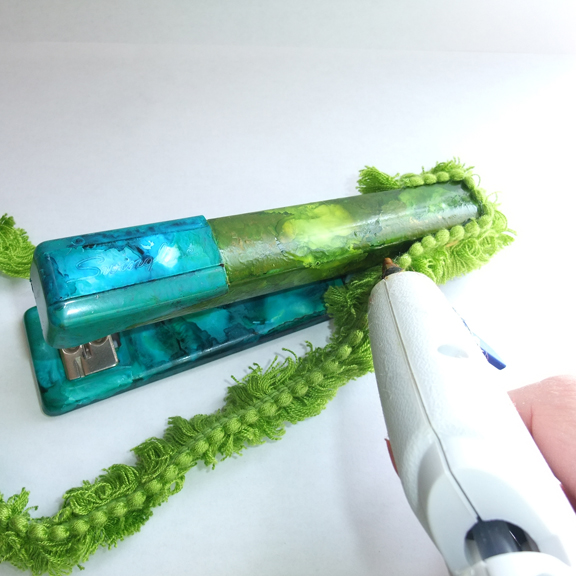
4. Choose a coordinating trim to decorate the top edge of the stapler. Cut the piece to fit all the way around the top edge. Make sure the trim does not interfere with the loading of staples or the stapling! Use a glue gun to adhere.
5. Don’t forget about the staples! Who says staples need to be a boring silver? Apply Jacquard Piñata alcohol-based paint directly from the bottle to the top and sides of the staples. You can paint an entire row one color or make a rainbow-colored staple row so you never know what color will emerge next.
Enjoy your one-of-a-kind, extraordinary stapling sensation. This functional work of art will brighten up any office space making work seem more like play.
TIPS: Experiment with different paint combinations on the aluminum palette before applying to the stapler. Limiting your palette to three or four colors may produce the best results.
Try painting wet on wet, as well as allowing the colors to dry between applications.
Add white to the colored paints for a more opaque effect. However, the color will still remain somewhat translucent blending with what’s underneath.
Young artists can try this project too. Nobody should be stuck with a boring stapler!
Remember there is no right or wrong way to paint a stapler.
For a printer friendly pdf of this project click here.
p.s. I’m super excited to now be collaborating with Jacquard Products to develop new project ideas with their fabulous art supplies! In the notice of disclaimers all Jaquard products have been provided. However, a glowing recommendation is all my own.


AWESOME!!!! I love art for fun!!! Those are the best times!
And congratulations to develop new ideas with Jacquard Products!!! This sounds soooo exciting!!!!!! Have lot’s of FUN!!!!!
Smiles, Anke ;)
Love, love, love your creativity! So glad I found your blog. I’ve nominated you for the Versatile Blogger Award. Check out my post @http://sleepyheaddesignsstudio.blogspot.com/2011/04/my-first-award.html