Blog

August 31, 2010

A piece of heART


My very youngest is in the process of phase-in to all day kindergarten. Over these first two weeks, she’s slowly working her way up to being at school for an entire 8:00am to 3:00pm day. I’m working up to that too. It’s strangely quiet here. She knew I’d miss her, so she made me this Perler bead heart.  She gave specific instructions to “kiss it when you miss me.”  sigh. She is so much older and wiser than her five years.

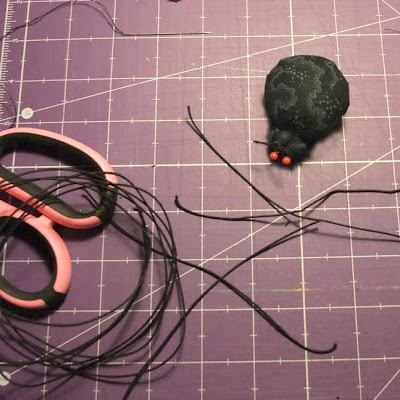
Speaking of which, we are huge fans of perler bead crafting around here.  All three of my kids (and many of their friends) enjoy it, with the added bonus that it’s a pretty fabulous hand-eye coordinating activity too. If you’re not familiar, Perler beading is where you design a pattern on pegboards (like you see above) placing…

..plastic Perler beads on the pegs. Then, a responsible adult covers with ironing paper, irons  and the beads magically melt together. Finally you take the creation off the mold, iron the other side and there you have it…a piece of art. Kisses optional.

Filed Under: crafts, kids
November 17, 2009

Hanging Acorn Frame tutorial

My girls and I went for a fall walk the other day. Crunching under our feet were hundreds of little acorn hats. We stopped to inspect them closer, loving their tiny details…an absolutely gorgeous crafting material. We collected as many as our pockets could hold and brought them back to the studio for some acorn brainstorming. While my daughters dreamed up a family of acorn people, I worked to create an acorn frame with a hanger.

materials needed:
acorn tops of various sizes
flat wooden frame with at least an 1 inch border
hot glue gun
brown craft paint
paintbrush
20 inch piece of 1/2 inch wide brown ribbon
a photo or piece of art to frame

step one.
Remove the glass and back of the frame for crafting purposes. Paint the frame with brown craft paint.

step two.
Attach the ribbon middle to a large acorn top by hot gluing the ribbon into the acorn.


step three.
Hot glue the ends of the ribbon to the top of the front frame corners like so.


step four.
Hot glue acorn tops to the front of the frame. You will cover where the ribbon was previously attached.

step five.
Insert the frame glass along with a photo or a piece of original art and hang your finished creation on a wall or a doorknob.

Giving thanks for the little things including time to paint, craft and look for acorns. : )
October 23, 2009

When a spider leads to a pumpkin

Inspiration is a funny thing. It begins as a spark and catches quick if you let it (kind of like a certain flu you may have heard is going around.) In the case of inspiration, it’s a good thing (the other, not so much.) I ‘ll admit that when I’m asked to help with 5th grade math I don’t jump quite as fast as when my 7-year-old son (or any child for that matter) comes to me asking for help with a craft idea. Brendan thought the spider pincushion I made earlier this week was pretty cool. He told me he had another idea for a pumpkin pincushion and wondered if I could help him make it. Let me tell you, when my sports driven-nintendo playing-legoite-son asks to make a pin cushion you had better believe it gets my attention.

We quickly gathered our supplies which consisted of orange fabric, orange thread, a bottle cap, fiberfill, black felt and a green chenille pipe cleaner. Then using the exact same technique as with the spider body, I guided him in the making of his one-of-a-kind creation. After Brendan had the pumpkin all sewn up, he cut the eyes and a mouth out of the black felt and attached with liquid stitch. Then, he cut a bit of the chenille pipe cleaner for a stem and inserted it in the top of the pumpkin. Finally, Brendan added a few pins to top off his completed pincushion. He was so proud he even brought it to school to show the class.

While this cute pumpkin is smile-inducing on its own, it’s the fact that it was created from a tiny spark of inspiration by a 7-year-old boy that makes me smile the most.
October 19, 2009

Bottle cap Spider Pincushion

Just in time for Halloween, I’ve put together a quick little project to add a dash of fun to your sewing area. That’s if you can get your…ahem…three kids to stop playing with it.

Here are the craft supplies you’ll need:
1-4 inch circle (spider body) and 1-2 inch circle (spider head) cut from your choice of fabric
Coordinating thread
1 bottle cap
2 beady red straight pins (spider eyes)
4-5 inch pieces of black craft wire (spider legs) and 1-1 inch piece of craft wire (spider palps)
Fiberfill
pliers, wire cutters, fabric scissors, needle

To make the spider body, straight stitch around the edges of the 4 inch circle. Then pull the thread slightly to gather up the edges. Stuff with fiberfill. Insert bottle cap. Now gently pull the thread to enclose the fiberfill and bottle cap in the fabric. Stitch to secure the bottom of the spider body. To make the spider head, repeat the above steps with the 2 inch fabric circle omitting the bottle cap.

Now attach the spider head to the body with the sewn end of spider head facing the body so that your stitching doesn’t show.

Stick the beady red straight pins into the spider head for eyes. Just under the eyes insert the 1 inch piece of craft wire. These are the spiders “pedipalps” or in simpler terms “the little thingeys that stick out by the mouth that make a spider “spiderish“.”

Next, carefully insert each craft wire through the bottom of the stuffed spider body to make a total of eight legs. Use pliers to shape the legs like so.

Place the completed spider pincushion on a doily web. You may just want to keep her out all year long. She does know a thing or two in the sewing department.
Filed Under: crafts, projects
September 21, 2009

Sweet Sweater Rosettes

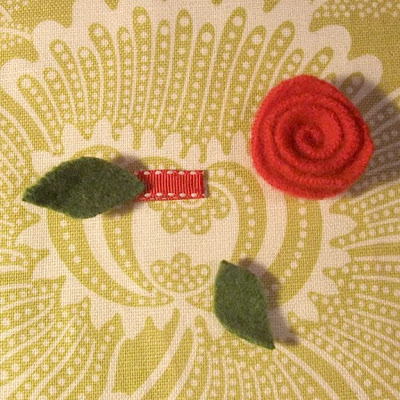
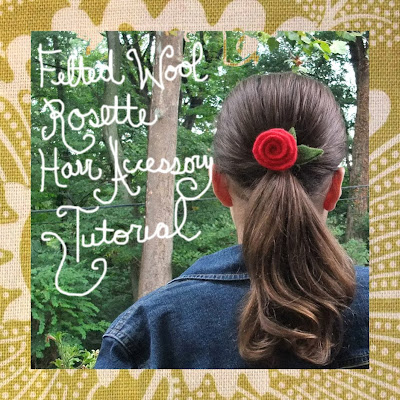
The past week has been filled to the brim with design work, kid’s homework and activities plus all the usual. That doesn’t mean that I haven’t been dreaming of new projects. Over the weekend, I took a crafty time out and made a half dozen or so of these happy rosettes from recycled felted wool sweaters. The idea stemmed from a rosey wreath project by Betz White in the new Holiday Crafts magazine by Better Homes and Gardens that I’m planning to make very soon.

This tutorial focuses on a hair clip, but the idea can easily be adapted for pony tail holders, headbands and pins.


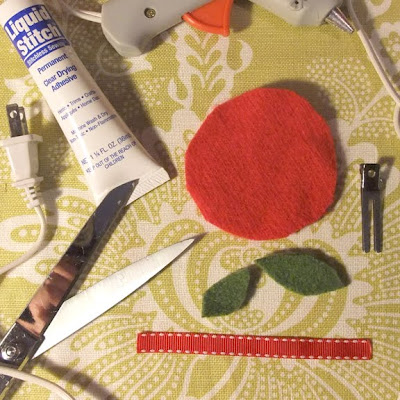
In addition to felted wool (in the colors of your choice), you’ll need a 3/8 inch coordinating ribbon, a hair clip, fabric scissors, fabric glue and a glue gun.

To felt wool: Place your thrifted or unwanted 100 percent wool sweaters in the washing machine. Wash on the HOT cycle. Place the sweaters in the dryer. Basically do all that you would never dare do with 100 percent wool sweaters and feel very rebellious. Next, go over to your local tattoo parlor…kidding. Do that after you make your rosettes.


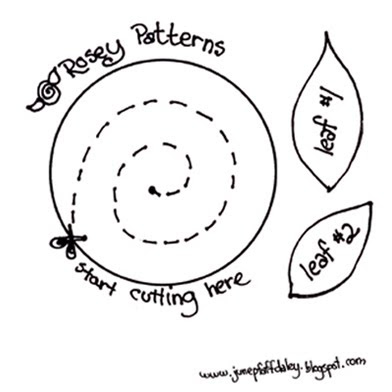
For the patterns, left click on the above image and print. Your circle pattern should be approximately 3 inches. If for some reason your circle prints larger or smaller than three inches, adjust the print percentage as necessary.

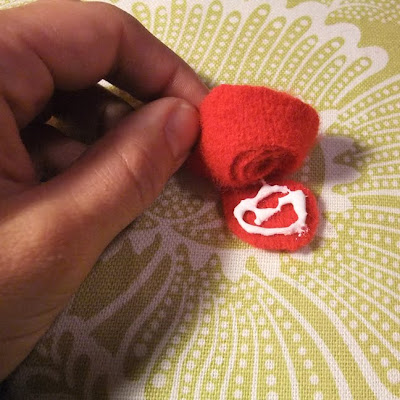
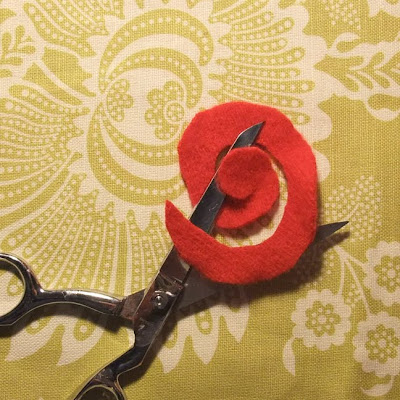
Using your pattern, cut a circle from the rose wool color. Then, cut a spiral shape using the pattern as a guide. It doesn’t have to be perfect (no flower is) so wing it with confidence.

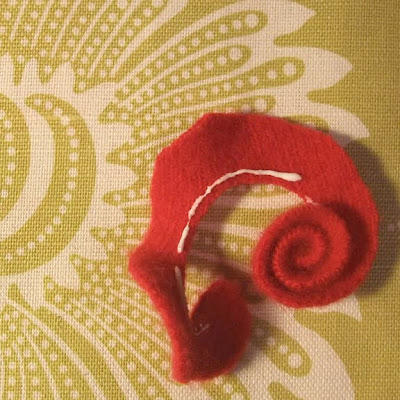
Starting from the outside of the spiral, use fabric glue to attach at the bottom edge of the flower. Wind to shape the rosette.

When you get to the end of the spiral, glue the flower to the end of the wool like so.

To decorate the hair clip, take a coordinating color of 3/8 inch wide ribbon cut to 4 1/2 inches in length. Starting from the back of the clip, hot glue the ribbon up, around, over and under the clippie.

Next, cut two leafs from the leaf-colored felted wool using the pattern as a guide. Hot glue the leaf shapes to the clip followed by the rosette.

Make a rosette to match every outfit. Take a deep breath, smile and go back to the real world. Tattoos optional.
Filed Under: crafts, projects
August 17, 2009

Chalk it up

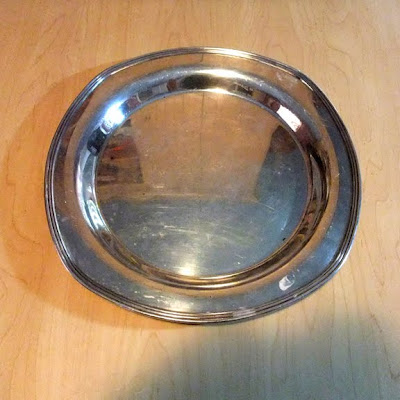
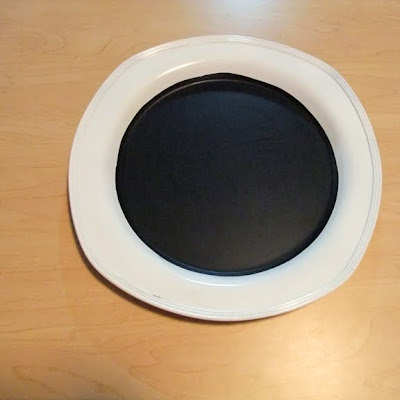
Here’s a summer project that’s been on my list. I’ve had a quart of chalkboard paint in my studio closet for the longest time. My original intention was to add some chalkboard real estate to the basement/kids area. However, my recent read of Jen’s blog about her chalkboard paint tray transformation inspired me to do something similar, but I changed my chalk tray up with a button twist. (disclaimer: please don’t worry as the poor children weren’t left out of the quart…this tray was in addition to giving them chalk space, but that’s another post.)

If you don’t have one of these that you’re willing to transform, don’t fret. Any respectable thrift store will have a few to chose from. I purchased my silver tray at a yard sale for 25 cents. I wanted something simple with an easily embellish-able edge.

First, I primed the entire tray–front and back–with a spray primer (don’t skip this step…it makes tray painting so much easier!) Next, I used white spray paint to cover the entire front and then back of the tray. After that was dry, I applied chalkboard paint to the inside of the tray leaving the rim white. I needed two coats to get maximum coverage.

Let’s take a moment to talk about my button collection. I’ve been snatching them up for years at thrift stores and yard sales. Is it possible to have too many buttons?! I was proud of myself for actually using a small part of my button stash for this project. I tend to have some hoarding characteristics when it comes to buttons so this was good therapy.

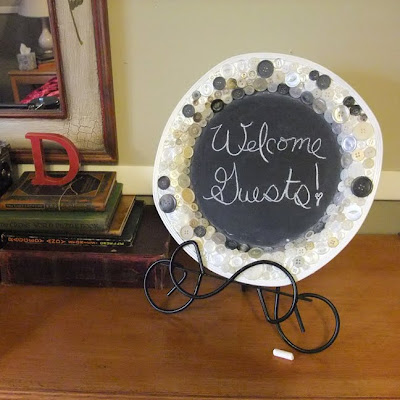
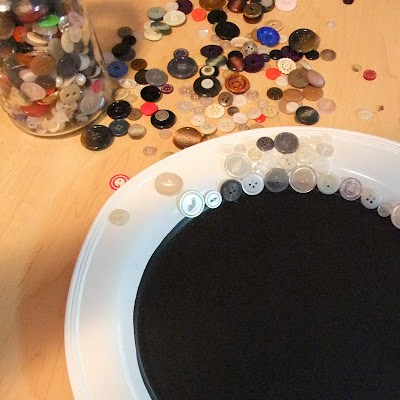
Back to the tray, starting at the inner edge of the rim (where the black meets white), I attached various sized buttons. It’s kinda like a jigsaw puzzle fitting the right size button into the space. I kept my button palette mostly in the white family, but inserted a few chalky colored buttons for interest.

tahDah! I positioned my finished plate on a plate stand (a stand that was an ugly bronze, but a quick coat of black spray paint changed all that) and wrote my welcoming message.

I’ll undoubtedly personalize the message for the various family and friends that visit and stay in our guest room over the year. We love our visitors, so I’m very excited to have this extra welcoming touch.
June 15, 2009

Carving out time

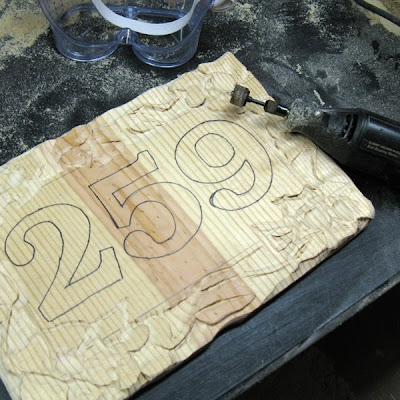
The past week or so feels like a blur. I think if you asked me what I’ve been doing to be soooo insanely busy I would have absolutely no idea. Well besides design work, adopting a kitten, running kids to~nature camp, the pool, haircuts, dance lessons etc~ and then carving out this long overdue house number sign for some very special residents. My parents had requested that I make them a sign similar to the one I made for our house. They’ve been very patient…maybe even thinking their dear daughter forgot…but alas I made it a point to finish in time for their visit over the weekend.

sign specifics: I cut a piece of soft pine (approx. 12″ x 8″ x 1-1/2″ ); pencil transferred the house numbers and freehanded the flower border; dremeled the border to add some dimension; then…


…painted with rich red, green and brown tones to compliment their house. Three layers of heavy duty shellac will protect it from the elements.

I finished just in the nick of time for them to take home when departing this morning. My Dad will be attaching hooks so that this can hang on a lamp post. Now I’m reminded that our house number sign could use a restoration job after hanging outside for 10 years. Added to the list.

It has been awhile since I’ve stirred up sawdust and worked with wood so it was a fun project. Now I’m eager to get back to other endeavors including finishing up a few soon-to-be published articles. Details in the upcoming months! ; )

Filed Under: crafts, projects
May 15, 2009

Dear Teacher…

Poem written by me. Inspired by a sometimes mischievous, always loveable seven year old.

Frustration pencil craft kits are available for sale in a variety of colors over at my etsy shop. Each kit makes six pencils. That’ll cover a bunch of ready-for-summer teachers (and I’ll betcha they’ll smile : )

Plus a little bonus to make the crafters smile too.

(poem for private use only…please contact me if you’d like to post or use elsewhere.)
Filed Under: crafts, kids, projects
April 29, 2009

Bags and tags

The bags for the show have arrived!! yep…colorful, fun and best of all~earth friendly. After pouring over options I decided on these. I LOVE a good shop bag (I’ve been known to ~she admits bashfully~ make purchases just to get the bag.) These non-woven fabric reusable bags are made of virgin polypropylene fiber that is 100% degradable. The cost averaged out to about 85 cents each for different colors in assorted sizes. To me that is money well spent not only for the reuseable factor, but to give my customers something special and show that I value my art. In my opinion, mixed messages are sent when vendors stick their gorgeous handmade items in a Wal-Mart bag. It devalues both the item(s) and the handmade movement. A cake with no icing or worse yet, a cake with big ugly mass retailer advertising all over it. Now hopping off my soapbox…

I also just received my freshly designed business cards. Overnight Prints did the printing and I’m quite pleased with how they turned out. little details: I requested rounded corners for a more handmade/less commercial touch. Also, had the front of the cards coated, but left the back uncoated to pen notes and thank yous.

As for tags, I’m using these awesome Fiskar squeeze punches to cut circles and squares from decorator paper. You squeeze the handles together and out pops a perfect circle or square (and they have tons of other shaped punches available.) The best part is they are designed so that you can see exactly what you are doing. You can punch shapes at lightening speed…such a great investment. Easy on the hands too.

Fluffy fibers attach cards to bags and tags to items. Here’s “Love Bird” getting all tagged and ready for her first show. I’m finding out that prepping for an art show is more time consuming than I E*V*E*R dreamed. Admittedly, it’s not helping that I am a sweater of the small stuff and think about details almost to a fault. The already packed lint brush and first aid kit are proof. Now watch me forget the art.
March 9, 2009

A recipe for cupcakes

Here’s a book I’ve had my eye on for some time. I finally purchased and found myself completely inspired and totally excited about the possibilities of felting with cast-off wool sweaters. Mainly because I don’t knit and I’m pretty sure that I don’t have the knitting gene. I’ve tried several times and found knitting needles and yarn more stressful than soothing. But maybe, like running, I didn’t stick with it long enough to get into that zone I’ve heard about. Plus after my three year old got a hold of my in-progress scarf and pulled…well that marked the end of that.

Betz White put together a book filled with projects that even a beginner felter like myself can whip up with ease. The first step is to acquire a variety of wool sweaters. As luck would have it, it’s the perfect time of year to find them for a steal at thrift stores.

The only new material I had to buy was an assortment of felt balls. Pretty little things aren’t they?

Here’s a look at the treats I put together…the infamous cupcake pincushions from the cover. Maybe not as perfect as Betz’s, but satisfying just the same. Hope you’re having a sweet Monday!
Filed Under: crafts, projects

Copyright 2024 June Pfaff Daley/Daley design, LLC
A Darling Site