While my blogging life as been on a rather extended break, please follow me over on Instagram @junedaleyart for previews of my latest work!


While my blogging life as been on a rather extended break, please follow me over on Instagram @junedaleyart for previews of my latest work!

 One of the first stencils I designed for StencilGirl was the Spider Web stencil. I’m not sure what that says although I’m betting I was prepping for Halloween and thinking how I needed a web stencil. I’ve used it for many of my Halloween projects including this pillow. If you’re interested in making your own, the complete tutorial can be found over on the StencilGirl blog. What projects will you be creating this fall?

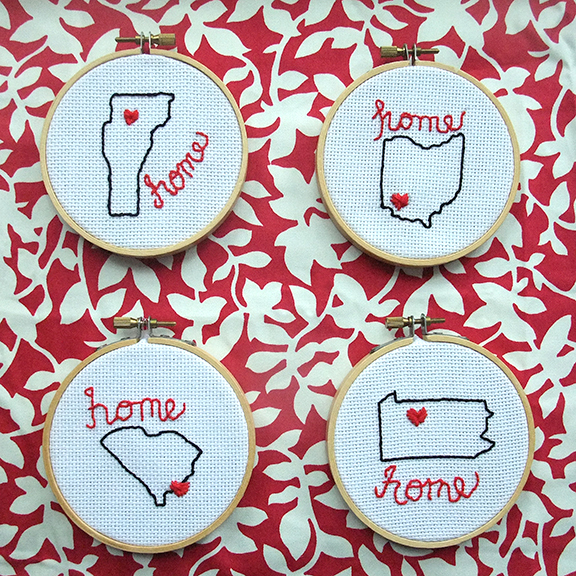
Today I’m showing some state love over on the Stencil Girl blog. These personalized, embroidered hoops make great gifts for family and friends. Click here for the full project!


I’ve had about enough of the snow. And cold. And ice. So I’ve started my spring cleanout which in my mind is the equivalent of a rain dance. Logical right? If I spring clean, spring will come? Please don’t tell me otherwise.
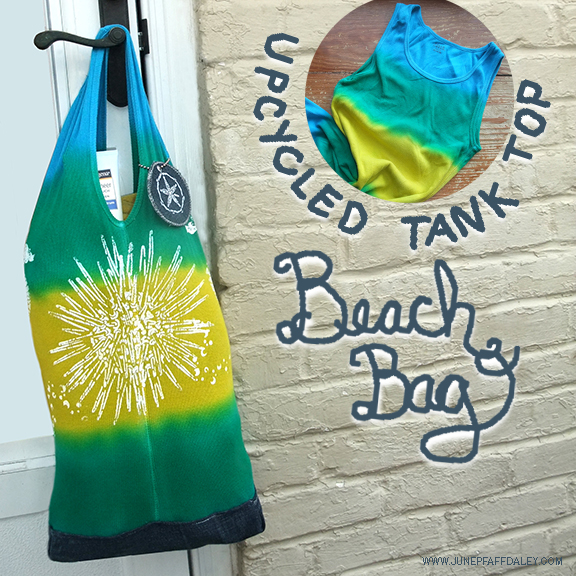
As often is the case, with one project comes another and pretty soon I’m turning one of the girl’s outgrown tank tops (plus a pair of jeans) into a beach bag and a tag. For the complete tutorial, click over to Stencil Girl. Spring cleaning and ocean themed stencils? Yep, spring is sure to come sooner rather than later. You can thank me later.

 Today, I have two new stencils debuting over at Stencil Girl: sea urchin and sand dollars. In their honor I’ve whipped up a batch of tea towels that are super easy to make. As a bonus they make great gifts, think Mother’s Day and end-of-the-year teacher. For the complete how-to click here.
The latest stencils I designed for StencilGirl had me thinking of boardwalks, foamy waves and saltwater breezes. If you want to transport yourself back to your favorite days on the beach, forget holding a shell to your ear and try stenciling instead.
I made the three pillows above using my hot-off-the-press stencils (above) plus other materials I had on hand. Granted I have a pretty decent material stash (hoarder alert), but I promise these pillows are simple and quick to pull together. Here’s a general tutorial of how to create your own comfy beach pillows.
MATERIALS: (but feel free to improvise)
fabric paint (I used Lumiere acrylics for a bit of sparkle) . stencils . stencil brush . canvas on a roll (click if you want the exact stuff I used) . burlap (for pillow back) . material scraps reminiscent of the sea . trim . pillow form . sewing machine . needle . thread
1) Cut the fronts and backs of your pillow from fabric sized to fit your pillow form. I used burlap for the pillow backs and the unprimed side of the canvas for the pillow fronts (I liked the natural canvas side better for this project.)
2) Plain out your design before stenciling on the fabric. Taking the time to do a practice pillow on a similar size piece of scrap paper will be time well spent. You get one shot on that fabric folks!
3) When ready to stencil on the fabric: lay ironed canvas flat, position stencil and apply paint. Make sure your brush is not too wet. Again, practicing before will allow for better results on the real deal. Take my word for it.
4) I used several warm Lumiere colors to add depth and interest. Subtle, yet awesome. You can kind of see the variation of colors above, but admittedly it’s hard to capture in a photograph.
5) Let your pillow fronts dry. Above see how I chose to design my pillows (Wet, please don’t touch.)
6) Add some fun! Buttons, trims, fabrics etc. Stitch embellishments to the pillow fronts before you sew the front and back together. Otherwise you will have a seriously difficult time here.
7) Now place the front of the pillow under the front of the back of the pillow (inside out). Add some side trim if you desire and sew together. Remember to leave an opening to insert the pillow form.
8) Insert pillow form and hand stitch the pillow shut the rest of the way.
9) Enjoy a bit of the sea even if like me, you don’t have an oceanfront address.
Thanks for stopping by. It was certainly nice to meet you if you’re new over here. The blog hop party continues below with the Original Stencil girl, Mary Beth Shaw! (that must be how it feels to be a presenter at the academy awards. I sure lucked out.

It happens almost every Sunday. I’m in Church with my three kids and inevitably one whispers about needing a tissue. I scramble to find something adequate in my purse, but it seems I’m often fresh out. This inspiring scenario led to the idea to make cases for tissue packs to whisper back “bless you” the next time they were needed (and I’ll never admit I created this project in my head during the homily, although thinking about angels and blessings is appropriate, right?!)
As the holiday season approaches, I’ll be creating more of these to “bless” family and friends. This quick and easy project make adorable stocking stuffers for loved ones. They also make the perfect holiday gift for those angelic teachers.
PROJECT MATERIALS:
6 1/4″ X 7″ piece of Jacquard Stabilized Fabric
6 1/4″ x 7″ piece of coordinating fabric
Jacquard textile fabric paints
Jacquard Lumiere metallic acrylic paints (I used Metallic Gold; Pearl Turquoise; Pearl Violet; Pearlescent Magenta; Pearl White; and Pewter)
coordinating thread
iron
sewing machine
paint brushes
DIRECTIONS: 1. Cut one 6 1/4″ x 7″ piece of Stabilized Fabric and lightly draw an angel design with pencil. (Click angel pattern above for a printable PDF of my design. Use tracing paper to transfer on fabric.)
2. Paint the angel and background with fabric paint. Use Lumiere metallic colors for the wings, halo and background.
3. Let fabric dry for 24 hours before peeling off backing. Remove paper backing and heat set with iron for three minutes.
4. Cut a coordinating 6 1/4″ x 7″ piece of fabric. With right sides together of the coordinated fabric and painted fabric, stitch 1/4 inch from the edge all around the outside of the fabric. Leave about a 1 inch opening for turning near the bottom of the angel.
5. Turn and press. Fold the sides of the tissue holder with coordinating fabric facing out. Overlap the edges approximately 1/4″ in the middle.
6. Stitch 1/4 inch from the edge along each short end.
7. Turn right side out and insert a pocket tissue pack.
TIPS: Dip a wooden dowel in white paint and “stamp” on your fabric to make a quick and uniform dot pattern.
Make each angel unique by painting different hair and skin colors.
Work assembly style and you’ll be blessed with a chorus of tissue holders to gift before you know it!
p.s. I’m super excited to now be collaborating with Jacquard Products to develop new project ideas with their fabulous art supplies! In the notice of disclaimers all Jacquard products have been provided. However, a glowing recommendation is all my own.
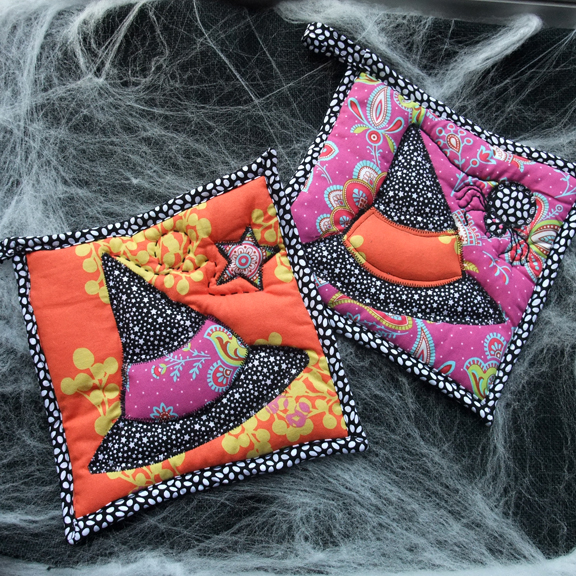
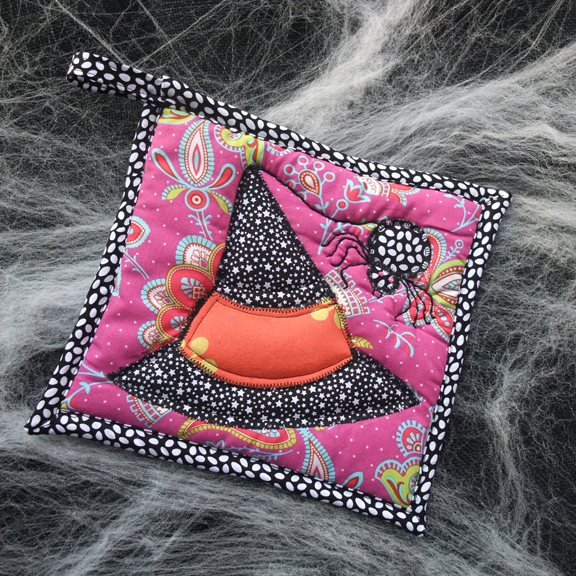
 Wondering how you’re going to handle your hot caldron this Halloween? How funny…so was I! Witch, I mean which : ), is what inspired me to design a couple of quilted caldron/pot holders. Follow along for a quick tutorial.
 materials:
4 assorted fabrics (9″ x 9″ top; 9″ x 9″ bottom; hat and star according to pattern; 40″ x 2″ binding; 6″ x 2″ loop hanger); batting (3-10″ x 10″ squares); fusible web; iron; sewing machine; thread; needle; embroidery floss.
 1. Use my free pattern (click here) to trace the hat bottom, middle band, hat top and star onto the smooth side of the fusible web, leaving a 1/4″ allowance all around each shape. Cut out the shapes just outside the marked lines. Press the hat shapes and star onto the wrong side of each of the chosen fabrics. Cut out the shapes accurately along the marked lines. Iron the shapes to the quilt top.
 2. Make a quilt sandwich with the bottom/back fabric, three pieces of batting and finally the top/front of the potholder (a.) Pin together with safety pins.
3. Use a variety of machine stitches to quilt your block together (b.-c.) Use hand stitching to quilt the twirly line connecting the star to the hat.
4. Trim the excess batting from sides to make a perfect square.
5. To make the hanger loop, fold a 6″ x 2″ fabric strip in half lengthwise and press. Open out and fold each raw edge toward the center fold. Stitch along the long edges (d.) Set aside.
6. Cut a 40″ x 2″ strip of fabric for the edge binding. My new favorite way to machine attach binding is courtesy of my quilting instructor, Heather. She has a fabulous picture heavy tutorial here. Attach the loop hanger into the left hand corner of the binding.

For an alternative design, I attached a spider to the end of the hat rather than a star. The spider consists of two fused circles and hand-stitched legs and eyes.
Enjoy creating a funky piece of functional decor just in time for Halloween!
When I first started this project back here, I didn’t think I’d ever see the day. I knew a quilt would be a big project, but I had no idea just how B*I*G. I certainly learned a lot through the process. For one, I can say that my second quilt project is somewhere in the far, far, far future. Perhaps when the kids are in college or maybe when the grandkids are in college. Until then, I’m quite content using my new quilting skills for smaller projects like pillows and potholders.
Here’s a closeup. I had hopes and dreams of doing some sort of fancy quilting technique…free motion pebbles maybe? However, I quickly realized that sticking to straight lines was a much safer bet. Actually…sending it off to a person to do the actual quilting would have been even safer, but this was about the learning (repeated to self over and over especially when holding seam ripper.)
Here’s what’s happening on the quilt back. We can’t talk about how many hours this project involved (my husband might be reading). However, what could be better than a warm, handmade, one-of-a-kind quilt (finished!) on a cool fall day?!
Smaller quilting projects coming soon.

Five weeks have passed since my first modern quilting class. Even though the class description mentioned “substantial homework“, I really had no idea what I signed up for. I found they weren’t kidding about the homework at least in my case. My fellow classmates just happened to be super sewers, hardly beginner quilters. I often looked around for hidden cameras thinking I was being punked for some reality sewing show. I reread the class description…yes…intro to quilting. Hmmmm…I was suspicious. Where did these ladies find the time to get all of those blocks completed? Two with kids younger than me…that friendly Jessica with a newborn! Clocking 65 mph on the sewing machine and still maintaining 1/4″ seams?! How did they make all of those cuts and actually have blocks the same size as the pattern?! Thankfully (even though I still suspect they have trunks filled with gorgeous handsewn quilts hidden in attics), they’re a great group and completely supportive. Heather, the instructor, has also been a gentle source of encouragement from week to week. To be here today with both a complete quilt top and quilt back is amazing to say the least. It has been good for me to step out of my comfort zone and attempt a project that seemed all big and scary. The class has kept me on track. My sewing skills and math (did you know about the math?!) are also improving rather nicely.
Class this week will be making the quilt sandwich. Say a prayer (or fourteen) that my top and bottom actually kindof match and it all works out. The final class will be edging and then I’ll have my very own handmade 74″ x 74″ quilt ready to live on the family room sofa. Exciting, to say the least. Quilting is like running a marathon. Hopefully, I’ll be able to save enough steam for the final stretch.
I’m pretty sure my family members are excited to be done with pin minefields happening here in just about every room. We’re typically a no-shoes-in-the-house family, but this quilt project has been leaving pins everywhere making ‘no shoes’ dangerous. Even I can’t explain where they’re all coming from. Yesterday the Mr. Funny Guy I married, pretended to have a pin stuck all the way through his big toe. Hilarious. Actually, the pets and small children have averted serious injury to date so we’re good.
In other quilting news, imagine my glee when I found this iron at a yard sale. I initially fell in love with the Oliso iron at Sewn studio a.k.a. quilting class headquarters. It’s an iron with little feet that lift up when you release the handle and go down when you touch the handle. Therefore, you never have to prop the iron up on its side between presses. It’s the most amazing super steam iron I have ever used. After a couple times using this, just try to go back to a cheapie. Trust me, it’s painful. But the retail price which falls between $110 and $160 is pretty painful too. So when I stumbled across a brand new/never been used/still in the package/Oliso iron at a yard sale for $20 you had better believe I had a moment. It makes seam pressing a breeze. Talk about luck. Just love those summer yard sales.
Now I’ll be getting back to everything else neglected since the start of the great quilt project. Look for the final reveal coming soon…

