December 12, 2011
‘Bless you’ Angels: A pocket tissue holder project

It happens almost every Sunday. I’m in Church with my three kids and inevitably one whispers about needing a tissue. I scramble to find something adequate in my purse, but it seems I’m often fresh out. This inspiring scenario led to the idea to make cases for tissue packs to whisper back “bless you” the next time they were needed (and I’ll never admit I created this project in my head during the homily, although thinking about angels and blessings is appropriate, right?!)
As the holiday season approaches, I’ll be creating more of these to “bless” family and friends. This quick and easy project make adorable stocking stuffers for loved ones. They also make the perfect holiday gift for those angelic teachers.

PROJECT MATERIALS:
6 1/4″ X 7″ piece of Jacquard Stabilized Fabric
6 1/4″ x 7″ piece of coordinating fabric
Jacquard textile fabric paints
Jacquard Lumiere metallic acrylic paints (I used Metallic Gold; Pearl Turquoise; Pearl Violet; Pearlescent Magenta; Pearl White; and Pewter)
coordinating thread
iron
sewing machine
paint brushes
angel pattern
DIRECTIONS:
1. Cut one 6 1/4″ x 7″ piece of Stabilized Fabric and lightly draw an angel design with pencil. (Click angel pattern above for a printable PDF of my design. Use tracing paper to transfer on fabric.)

2. Paint the angel and background with fabric paint. Use Lumiere metallic colors for the wings, halo and background.
3. Let fabric dry for 24 hours before peeling off backing. Remove paper backing and heat set with iron for three minutes.
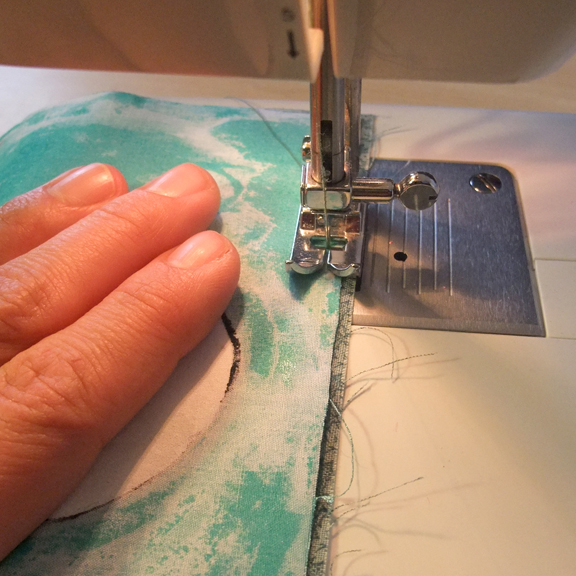
4. Cut a coordinating 6 1/4″ x 7″ piece of fabric. With right sides together of the coordinated fabric and painted fabric, stitch 1/4 inch from the edge all around the outside of the fabric. Leave about a 1 inch opening for turning near the bottom of the angel.

5. Turn and press. Fold the sides of the tissue holder with coordinating fabric facing out. Overlap the edges approximately 1/4″ in the middle.
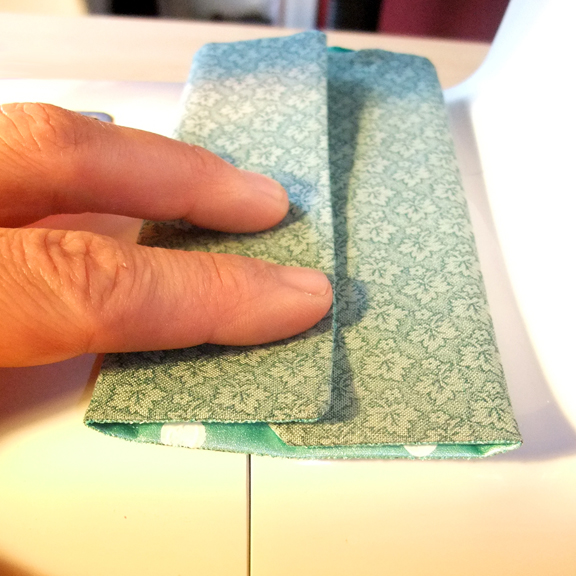
6. Stitch 1/4 inch from the edge along each short end.
7. Turn right side out and insert a pocket tissue pack.

TIPS:
Dip a wooden dowel in white paint and “stamp” on your fabric to make a quick and uniform dot pattern.

Make each angel unique by painting different hair and skin colors.
Work assembly style and you’ll be blessed with a chorus of tissue holders to gift before you know it!

p.s. I’m super excited to now be collaborating with Jacquard Products to develop new project ideas with their fabulous art supplies! In the notice of disclaimers all Jacquard products have been provided. However, a glowing recommendation is all my own.
June 21, 2011
Substantial Homework: The Quilt Project Update

Five weeks have passed since my first modern quilting class. Even though the class description mentioned “substantial homework“, I really had no idea what I signed up for. I found they weren’t kidding about the homework at least in my case. My fellow classmates just happened to be super sewers, hardly beginner quilters. I often looked around for hidden cameras thinking I was being punked for some reality sewing show. I reread the class description…yes…intro to quilting. Hmmmm…I was suspicious. Where did these ladies find the time to get all of those blocks completed? Two with kids younger than me…that friendly Jessica with a newborn! Clocking 65 mph on the sewing machine and still maintaining 1/4″ seams?! How did they make all of those cuts and actually have blocks the same size as the pattern?! Thankfully (even though I still suspect they have trunks filled with gorgeous handsewn quilts hidden in attics), they’re a great group and completely supportive. Heather, the instructor, has also been a gentle source of encouragement from week to week. To be here today with both a complete quilt top and quilt back is amazing to say the least. It has been good for me to step out of my comfort zone and attempt a project that seemed all big and scary. The class has kept me on track. My sewing skills and math (did you know about the math?!) are also improving rather nicely.
Class this week will be making the quilt sandwich. Say a prayer (or fourteen) that my top and bottom actually kindof match and it all works out. The final class will be edging and then I’ll have my very own handmade 74″ x 74″ quilt ready to live on the family room sofa. Exciting, to say the least. Quilting is like running a marathon. Hopefully, I’ll be able to save enough steam for the final stretch.

I’m pretty sure my family members are excited to be done with pin minefields happening here in just about every room. We’re typically a no-shoes-in-the-house family, but this quilt project has been leaving pins everywhere making ‘no shoes’ dangerous. Even I can’t explain where they’re all coming from. Yesterday the Mr. Funny Guy I married, pretended to have a pin stuck all the way through his big toe. Hilarious. Actually, the pets and small children have averted serious injury to date so we’re good.

In other quilting news, imagine my glee when I found this iron at a yard sale. I initially fell in love with the Oliso iron at Sewn studio a.k.a. quilting class headquarters. It’s an iron with little feet that lift up when you release the handle and go down when you touch the handle. Therefore, you never have to prop the iron up on its side between presses. It’s the most amazing super steam iron I have ever used. After a couple times using this, just try to go back to a cheapie. Trust me, it’s painful. But the retail price which falls between $110 and $160 is pretty painful too. So when I stumbled across a brand new/never been used/still in the package/Oliso iron at a yard sale for $20 you had better believe I had a moment. It makes seam pressing a breeze. Talk about luck. Just love those summer yard sales.
Now I’ll be getting back to everything else neglected since the start of the great quilt project. Look for the final reveal coming soon…

May 26, 2011
This will be a quilt…and repeat

Despite the fact that May has been a seemingly endless blur of end-of-the-year sports, banquets, dance recitals, school presentations, meetings, and appointments, I signed up for a 6 week modern quilting class. While the timing was/is less than perfect, I chose not to overthink the class fee, my schedule, my kid’s schedules, my husband’s schedule and all the other stuff getting in the way of my future in quilting (please note: ” future in quilting” comes with a smirk as this is yet to be determined.) An excuse to hang out at a cool, newly opened, designer fabric store minutes from my house was pretty great motivation as well. So here I am into week 2…fabrics have been chosen and I’m into the cutting part. Lots of cutting…

…to complete a Rail Fence quilt. We’re working on a project from the book above. Heather, our fearless instructor, swears we’ll have a quilt by the end of June. I’m taking her word for it. She believes in us.

I heard about this fiction book about the same time I signed up for my modern quilting class. It’s fun, light-hearted reading by the crafty chica that meshes well with my current sewing immersion. Which I promise to keep you updated on. Because there will be a quilt.

April 26, 2011
An Office Staple
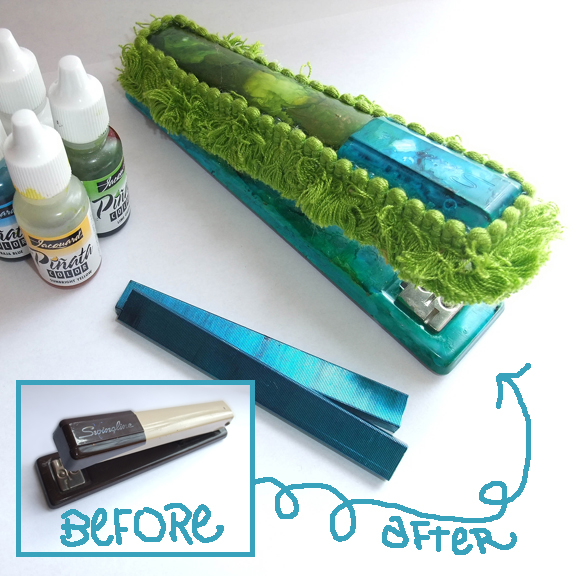
I’ve stared at the same old, ugly stapler on my desk for a long time. I use that standard office tool almost every day. I decided it was time that it got a makeover/sprucing up and joined in on my mantra of “art just for fun.” Now when I staple documents together, I can’t help but smile at my cheerful office companion.
PROJECT MATERIALS:
stapler;
staples;
Jacquard Piñata alcohol-based paint (I chose a palette of white plus three additional colors: sunbright yellow, lime green, baja blue);
Jacquard Piñata clean up solution;
Jacquard Piñata claro extender;
clear satin fixative;
16″ of trim (more or less depending on the size of stapler);
aluminum flashing (to use as a paint palette);
paint brushes;
glue gun and glue sticks.

DIRECTIONS:
1. Clean stapler as needed. When the stapler is clean and dry, apply paint directly from the bottle to the stapler. You may also squeeze a small amount of paint to the aluminum palette and apply the paint to the stapler with a paintbrush. Continue adding paint to the stapler. Piñata paints dry quickly so use claro extender if you want to buy yourself more drying time. Otherwise, enjoy experimenting. You can always remove the paint with the clean-up solution and start over if you wish.

2. After you have painted all the parts of the stapler, let dry, preferably overnight.
3. To give your stapler an extra coat of protection, spray with a clear satin fixative and let dry.
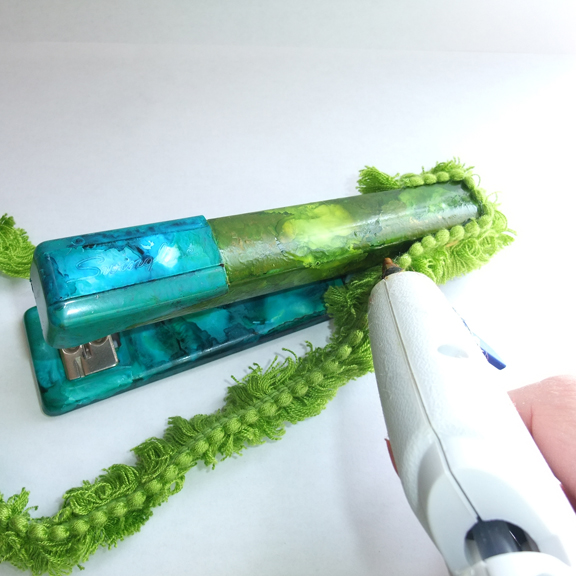
4. Choose a coordinating trim to decorate the top edge of the stapler. Cut the piece to fit all the way around the top edge. Make sure the trim does not interfere with the loading of staples or the stapling! Use a glue gun to adhere.

5. Don’t forget about the staples! Who says staples need to be a boring silver? Apply Jacquard Piñata alcohol-based paint directly from the bottle to the top and sides of the staples. You can paint an entire row one color or make a rainbow-colored staple row so you never know what color will emerge next.
Enjoy your one-of-a-kind, extraordinary stapling sensation. This functional work of art will brighten up any office space making work seem more like play.

TIPS:
Experiment with different paint combinations on the aluminum palette before applying to the stapler. Limiting your palette to three or four colors may produce the best results.
Try painting wet on wet, as well as allowing the colors to dry between applications.
Add white to the colored paints for a more opaque effect. However, the color will still remain somewhat translucent blending with what’s underneath.
Young artists can try this project too. Nobody should be stuck with a boring stapler!
Remember there is no right or wrong way to paint a stapler.
For a printer friendly pdf of this project click here.

p.s. I’m super excited to now be collaborating with Jacquard Products to develop new project ideas with their fabulous art supplies! In the notice of disclaimers all Jaquard products have been provided. However, a glowing recommendation is all my own.
January 4, 2011
Unwrapping a New Year

The past few months have flown by so quickly that if I didn’t have photographic evidence to the contrary, I’d swear I slept right through. As much as I enjoyed my stint over at Merrier Shopping, I’m happy to return to some bit of normal around here. Plus, I’m finally getting a chance to unpackage Christmas gifts. Like that 84 watercolor crayon set above. A definite upgrade to the pack of twelve I’ve been using. I could stare at those for hours. Just stare.

Here’s another package I’m excited (understatement) to open. These paints perform like magic on a variety of surfaces including plastic, leather and metal. Talk about endless possibilities. I promise I won’t paint the cats, but everything else is fair game.

I found these gorgeous papers on holiday clearance at Anthropologie. Apparently, I did have time to show up there *frequently* during the holiday madness.

I know my inkjet printer is going to love me when it gets a chance to do it’s thing on some amazing fabric sheets. The problem is figuring out which idea to send through first.
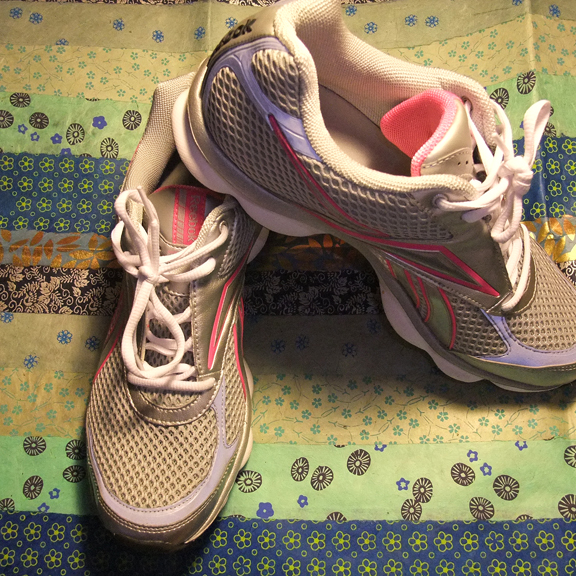
The sneaks were not a Christmas gift, but apparently they need to be unpackaged (from several months back) as well. Imagine my surprise when I discovered that Reebok Toners only work if you actually put them on and move around while they are on your feet. I vow to wear them in this year. We did walk yesterday and are even considering gym membership so I see a successful future.
The new year is bright with possibility. I’m looking forward to sharing my adventures ahead.

December 6, 2010
Still posting more than ever

My dear friend Anke softly reminded me that I haven’t been around here too much lately. My excuse is I’ve been continuing to post daily over at Merrier Shopping. I’m having fun writing about all things holiday, but I’m not going to lie. Daily posting including weekends is quite a job. Especially when you strive to make every post interesting by throwing in tutorials and illustrations to boot. If you didn’t follow me over, here’s a roundup of some past craft and recipe posts that I don’t want you to miss:
1) Glittered toy ornaments;
2) Chalkboard placeholders and acorn napkin holders;
3) Baked apples with cranberries;
4) Dressed-up Peanut Butter Cookies
Today, I resorted to letting my cat write the post. I may have lost it.Until I can hire an assistant, the felines of the family need to be on high alert as they could be called into service at any second. I really need to teach them how to work my Etsy shop..tons of new prints to load. Or maybe I should give up on sleeping…hmmmm….
While I mull it over, I promise to come around here more often now that I know someone is paying attention. Thanks Anke!
November 14, 2010
Surf for Sewing and Candy Tutorials

My holiday blog job has been keeping me busy to say the least. I’ve been posting over there daily since November 1st. This weekend, I’ve added two tutorials that my like-minded, creative friends might enjoy. You can make my original JOY potholder by clicking here.

You can also check out my step-by-step recipe for Rocky Road Bark candy by clicking here.
This week, I’m looking forward to meeting my GGP friends (sponsors of the Merrier Shopping blog) in person. We’ve been chatting over the phone and by e-mail for over a month so it will be great to connect with actual faces. And I hear there will be press involved. Pray for a good hair day. Thanks for visiting this site and my holiday blog. I can’t tell you how much I appreciate your support through the comments and the warm e-mails sent my way. Thank you! : )
November 4, 2010
A Thankful Check

Those of you who have been hanging out here for awhile might recognize my Thankful Checklist placemat. I originally created this for my kids to color and check on Thanksgiving day while the turkey was roasting. I wanted to make sure they really understood why we celebrated the holiday. Sure we tell our kids constantly that they have lots to be thankful for—health, a roof over their heads, food on the table—but there is so much more. Even us adults sometimes need to be reminded how awesome “a cozy blankie” really is.

Family Fun magazine included my Thankful checklist placemats in the latest issue. Click here to print out the first version and here to print out the second. (intended for private use only please.)
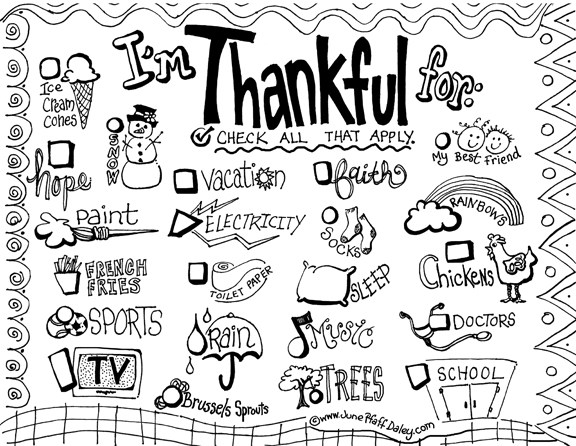
Here’s the latest version I created for this Thanksgiving, but perfect for any day of the year. And if you don’t check brussels sprouts that’s okay. I’m more of a french fry girl myself.
November 1, 2010
A winning post

A couple of posts back, I alluded to big new of some sort. Well here it is. Last month, I entered a contest that called my name. GGP (General Growth Properties…owner/developers of about 200 shopping malls across the country) were looking for a creative sort to write a daily blog about all things holiday from November 1st until December 31st. I was having one of those days with an extra hour or two (kind of like here) and thought, “sure, why not?” I went to work on all the submission material they requested and the rest is history. You can read more on the Merrier Shopping blog were I’ll be writing every day until the new year.
You’ll want to check it out as I’ve come up with a binder system to organize the holidays with free printables for gift lists, baking and more. I’ll also have holiday related posts including gift ideas, crafts, recipe exchanges, fabulous giveaways and stress checks to keep the season merry.
Just so you know, I’ll still be posting over here too. Certainly not “daily posting” unless my cloning machine comes back from the repair shop. I have no idea what’s taking them so long.
May 3, 2010
Rack refurbishment
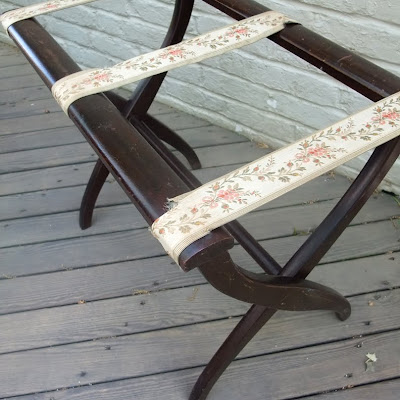 An antique luggage rack has been on my rummage/yard sale radar for a loooong time. When I spied this one two weeks ago (priced at $4), I grabbed it immediately. Luckily, there were no injuries. I had plans for this rack to live in our guest bedroom so suitcases would also have a nice place to rest.
 I didn’t even think twice about those worn ribbons.
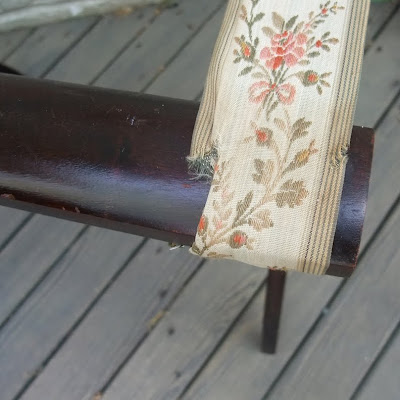 Instead, I saw a beautiful and functional piece of furniture that was perfect for an easy makeover project.
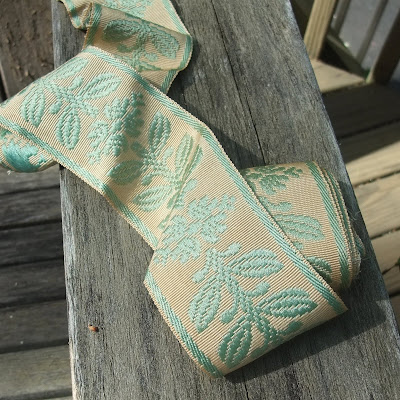 I happened to have this ribbon in my stash (also purchased at a rummage sale in a box like that one.) It was exactly the right width and had the same charm of the original luggage rack ribbon. I knew it was meant to be.
 It took about 30 minutes to transform my find including the ribbon replacement and a good polish. A project that was finished up just in time for our guests over the past weekend. Suitcases are now within arms reach at this hotel. And we don’t even charge extra.


